Dora: Difference between revisions
m (typos) |
|||
| (35 intermediate revisions by 4 users not shown) | |||
| Line 1: | Line 1: | ||
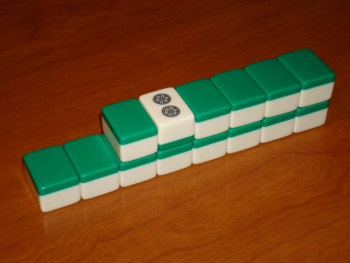
[[Image:Dora and Wanpai.jpg|thumb| | [[Image:Dora and Wanpai.jpg|thumb|350px|Dead wall showing 2-pin as the dora indicator.]]'''Dora''' {{kana|ドラ}} are special tiles; each dora in your hand grants 1 [[han]]. However, '''hands still require at least one [[yaku]] in order to score'''. Dora do not count towards the yaku requirement, so they are best considered as a bonus. | ||
At the beginning of every hand, fourteen tiles are set aside as the dead wall tiles. One dead wall tile is then flipped over. The tile sequentially after the flipped tile is considered dora. Additional dora may be revealed through [[kan]], known as '''kandora'''. Also, hands that declare [[riichi]] may score extra '''uradora'''. | |||
== Dora Indicators == | |||
{{Main|Wanpai}} | |||
For | For every hand, fourteen tiles are always set aside to form the '''dead wall''', or '''wanpai''' {{kana|王牌}}. One of these tiles, the third from the initial wall break as shown in the picture, is always flipped over to indicate the dora. The tile after the flipped "dora indicator" is the dora itself. For example, if 1-man is the dora indicator, then 2-man is the dora itself. | ||
The | The following lists the complete dora order. Note that the order loops around, and that doras do not "cross-indicate" tiles of another suit. | ||
===Suit order=== | ===Suit order=== | ||
| Line 23: | Line 20: | ||
===Wind order=== | ===Wind order=== | ||
:{{#mjt:1234z}} If the dora indicator is {{#mjt:4z}}, then the dora is {{#mjt:1z}}. | :{{#mjt:1234z}} If the dora indicator is {{#mjt:4z}}, then the dora is {{#mjt:1z}}. | ||
The wind order follows the same order as the [[Jikaze|seat winds]] in the same counter-clockwise direction as the normal turn order. | |||
===Dragon order=== | ===Dragon order=== | ||
:{{#mjt:567z}} If the dora indicator is {{#mjt:7z}}, then the dora is {{#mjt:5z}}. | :{{#mjt:567z}} If the dora indicator is {{#mjt:7z}}, then the dora is {{#mjt:5z}}. | ||
== | == Multiple Dora == | ||
Dora stack; a hand can have as many dora as it can fit into the hand. | |||
In the event a dora indicator is repeated | In the event a dora indicator is repeated, then the dora tile will be worth one han per repeated dora indicator. | ||
''' | '''Examples:''' | ||
* Dora indicators | * Dora indicators | ||
| Line 37: | Line 37: | ||
A single {{#mjt:6s}} is worth 2 han. | A single {{#mjt:6s}} is worth 2 han. | ||
* Dora indicator | |||
: {{#mjt:4p}} | |||
A single {{#mjt:0p}} is worth 2 han - one as a regular dora, one as an [[#Akadora|akadora]]. | |||
==Other types of dora== | ==Other types of dora== | ||
During the game, you may find additional sources of dora. | |||
===Kandora=== | |||
[[Image:Kandora.png|250px|right|thumb|Multiple dora shown due to [http://tenhou.net/0/?log=2014081810gm-0009-7447-935af6c5&tw=1&ts=5 kan calls].]] | |||
After a call for [[kan]], an additional dora indicator is flipped. Specifically, the tile next to the dora indicator counter-clockwise on the dead wall is flipped. These are known as '''kandora''' {{kana|カンドラ}}. | |||
Casual games will simply flip the kan dora immediately after kan. Others will differentiate between the kan types. | |||
*Open kans (both damiminkan and shouminkan) only reveal the dora indicator after a discard, or after the next kan. | |||
*Closed kans (ankan) reveal the dora indicator immediately. | |||
===Uradora=== | |||
'''Uradora''' {{kana|裏ドラ}}, or '''underneath dora''', are used whenever a hand wins with [[riichi]]. Therefore, no open hand may ever have access to the ura dora. In the event that any riichi-declaring hand wins, the tiles underneath the dora indicator(s) are revealed. These newly revealed tiles serve as additional dora indicators. | |||
For each kandora revealed, the hand gets an additional uradora indicator. These are known as '''kanuradora''' {{kana|カン裏ドラ}}. | |||
===Akadora=== | ===Akadora=== | ||
[[Image:Dora Haku.jpg|250px|right|thumb|Specially marked haku as dora, next to a standard haku tile.]] | [[Image:Dora Haku.jpg|250px|right|thumb|Specially marked haku as dora, next to a standard haku tile.]] | ||
'''Akadora''' {{kana|赤ドラ}} or '''akapai''' {{kana|赤牌}} are specifically marked red dora tiles. | |||
'''Akadora''' {{kana|赤ドラ}} or '''akapai''' {{kana|赤牌}} are specifically marked "red dora" tiles. Unlike dora indicators, having the red tile in your hand counts as a dora. | |||
Akadora are frequently included, but are not universal. Most modern mahjong sets will include two red 5p, one red 5m, and one red 5s. In actual play, one red five of each suit is used (excluding the second red 5p). | |||
:{{#mjt:0m0p0s}} | :{{#mjt:0m0p0s}} | ||
Sets may include other tiles marked "red" as automatic dora. Five happens to be the common choice because it is the center number within the 1 through 9 range. Though rarely found, some older sets include a "red haku" tile (white dragon), with some marking not present on the usual haku tile, and some sets include red threes. | |||
Though rarely found, some older sets include a "red haku" tile (white dragon). | |||
===Nukidora=== | |||
{{main|Sanma}} | |||
In some rules of three-player mahjong, the North tile may be used as special type of dora. By calling [[kita]], the North tile is placed aside, and the hand gains 1 nukidora. Then, the player gets a dead wall draw. North tiles not called for kita are not dora. | |||
== | ==Strategy== | ||
{{main|Dora strategy}} | |||
Because each dora is worth one han, dora tiles are considered valuable. The dora itself, as well as tiles around the dora, are generally more dangerous to discard. | |||
== | ==Rule variations== | ||
{{main|Dora variations}} | |||
Rules variations differ on the use of dora. | |||
*The initial dora is the most common - it is generally universal within Japanese mahjong. | |||
*Kandora and uradora may be excluded in some rulesets, but it is common to use both. | |||
*Akadora is the most optional, with many rules enabling/disabling them. Mahjong tile sets are often sold with red fives in addition to four regular fives of each suit. | |||
==External links== | ==External links== | ||
Latest revision as of 03:24, 1 April 2024

Dora 「ドラ」 are special tiles; each dora in your hand grants 1 han. However, hands still require at least one yaku in order to score. Dora do not count towards the yaku requirement, so they are best considered as a bonus.
At the beginning of every hand, fourteen tiles are set aside as the dead wall tiles. One dead wall tile is then flipped over. The tile sequentially after the flipped tile is considered dora. Additional dora may be revealed through kan, known as kandora. Also, hands that declare riichi may score extra uradora.
Dora Indicators
For every hand, fourteen tiles are always set aside to form the dead wall, or wanpai 「王牌」. One of these tiles, the third from the initial wall break as shown in the picture, is always flipped over to indicate the dora. The tile after the flipped "dora indicator" is the dora itself. For example, if 1-man is the dora indicator, then 2-man is the dora itself.
The following lists the complete dora order. Note that the order loops around, and that doras do not "cross-indicate" tiles of another suit.
Suit order
Wind order
The wind order follows the same order as the seat winds in the same counter-clockwise direction as the normal turn order.
Dragon order
Multiple Dora
Dora stack; a hand can have as many dora as it can fit into the hand.
In the event a dora indicator is repeated, then the dora tile will be worth one han per repeated dora indicator.
Examples:
- Dora indicators
- Dora indicator
A single ![]() is worth 2 han - one as a regular dora, one as an akadora.
is worth 2 han - one as a regular dora, one as an akadora.
Other types of dora
During the game, you may find additional sources of dora.
Kandora

After a call for kan, an additional dora indicator is flipped. Specifically, the tile next to the dora indicator counter-clockwise on the dead wall is flipped. These are known as kandora 「カンドラ」.
Casual games will simply flip the kan dora immediately after kan. Others will differentiate between the kan types.
- Open kans (both damiminkan and shouminkan) only reveal the dora indicator after a discard, or after the next kan.
- Closed kans (ankan) reveal the dora indicator immediately.
Uradora
Uradora 「裏ドラ」, or underneath dora, are used whenever a hand wins with riichi. Therefore, no open hand may ever have access to the ura dora. In the event that any riichi-declaring hand wins, the tiles underneath the dora indicator(s) are revealed. These newly revealed tiles serve as additional dora indicators.
For each kandora revealed, the hand gets an additional uradora indicator. These are known as kanuradora 「カン裏ドラ」.
Akadora

Akadora 「赤ドラ」 or akapai 「赤牌」 are specifically marked "red dora" tiles. Unlike dora indicators, having the red tile in your hand counts as a dora.
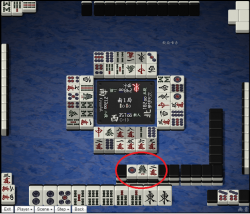
Akadora are frequently included, but are not universal. Most modern mahjong sets will include two red 5p, one red 5m, and one red 5s. In actual play, one red five of each suit is used (excluding the second red 5p).
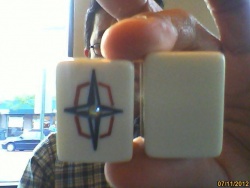
Sets may include other tiles marked "red" as automatic dora. Five happens to be the common choice because it is the center number within the 1 through 9 range. Though rarely found, some older sets include a "red haku" tile (white dragon), with some marking not present on the usual haku tile, and some sets include red threes.
Nukidora
In some rules of three-player mahjong, the North tile may be used as special type of dora. By calling kita, the North tile is placed aside, and the hand gains 1 nukidora. Then, the player gets a dead wall draw. North tiles not called for kita are not dora.
Strategy
Because each dora is worth one han, dora tiles are considered valuable. The dora itself, as well as tiles around the dora, are generally more dangerous to discard.
Rule variations
Rules variations differ on the use of dora.
- The initial dora is the most common - it is generally universal within Japanese mahjong.
- Kandora and uradora may be excluded in some rulesets, but it is common to use both.
- Akadora is the most optional, with many rules enabling/disabling them. Mahjong tile sets are often sold with red fives in addition to four regular fives of each suit.
External links
- Dora in Japanese Wikipedia