Honba: Difference between revisions
mNo edit summary |
m (note on chombo) |
||
| (10 intermediate revisions by 2 users not shown) | |||
| Line 1: | Line 1: | ||
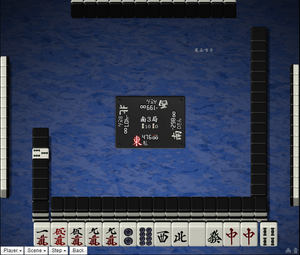
[[Image:Honba 10.png|thumb|right|Game extended to 10 honba [http://tenhou.net/0/?log=2014010103gm-00a9-0000-ca27a20c&tw=2&ts=9].]] | [[Image:Honba 10.png|thumb|right|Game extended to 10 honba [http://tenhou.net/0/?log=2014010103gm-00a9-0000-ca27a20c&tw=2&ts=9].]] | ||
'''Honba''' {{kana|本場}}, or '''tsumibou count''', is a point bonus: each honba adds 300 points to a winning hand's score. A honba is added whenever nobody wins (excluding [[chombo]]) or when the dealer wins. | |||
__NOTOC__ | |||
==Mechanics== | |||
===Honba count=== | |||
The following scenarios will increase the honba count by one for the next hand: | |||
* [[Ryuukyoku|Exhaustive draw]] | |||
* [[Abortive draw]] | |||
* [[Renchan|Dealer winning the hand]] | |||
When any non-dealer wins a hand, the honba count resets back down to zero. | |||
In online play, the honba count is automatically noted. When playing physically, the current dealer indicates the honba count by using [[tenbou|100-point sticks]] and placing them on the dealer indicator or on the table. These sticks are merely counters; when the seats rotate, the honba are returned to the previous dealer, and the next dealer assumes responsibility of tracking honba. | |||
A custom rule named '''basengo''' {{kana|場千五}} | ===Scoring=== | ||
For each honba in play, a winning hand's score increases by 300. For [[ron]], the discarder pays the additional 300 points. For [[tsumo]], everyone pays an additional 100 each (whether dealer or not). These extra points are added after the hand is scored, so the limits from [[mangan]] onwards do not apply. Points from honba are unaffected by the [[dealer]] bonus. For example: | |||
* A non-dealer mangan tsumo with 2 honba is worth 8,600 in total - it costs 2,200 for non-dealers and 4,200 for the dealer. | |||
* A dealer mangan tsumo with 2 honba is worth 12,600 in total - it costs 4,200 for each non-dealer. | |||
In the case of [[sekinin barai]], when the yakuman hand wins by tsumo, the discarder of the ponned tile has to pay honba. When it wins by ron, it is subject to [[rule variation]], but most rulesets have the discarder of the ''winning'' tile pay for the honba completely. | |||
A custom rule named '''basengo''' {{kana|場千五}} changes each honba to be worth 1,500, five times the normal value. This rule is not common, usually seen under gambling situations. | |||
==Strategy== | |||
At only 300 points/honba, just one or two honba will have little impact on overall strategy. It could be important in [[oorasu|all last]] (where 300 points can mean the difference between [[gyakuten|overtaking an opponent]]), but small honba counts shouldn't be considered otherwise. | |||
When there are many honba and/or [[riichi]] sticks in play, you should consider faster hands. E.g., with 3 honba + 1 riichi stick, a base 1000 point hand will end up scoring 2900, and prevent your opponents from benefiting from the honba/riichi sticks. | |||
==External links== | ==External links== | ||
{{jpwiki|麻雀の得点計算# | {{jpwiki|麻雀の得点計算#得点計算に関するその他のルール}} | ||
[[Category:Game rules]] | [[Category:Game rules]] | ||
[[Category:Terminology]] | [[Category:Terminology]] | ||
Latest revision as of 09:48, 28 June 2024

Honba 「本場」, or tsumibou count, is a point bonus: each honba adds 300 points to a winning hand's score. A honba is added whenever nobody wins (excluding chombo) or when the dealer wins.
Mechanics
Honba count
The following scenarios will increase the honba count by one for the next hand:
When any non-dealer wins a hand, the honba count resets back down to zero.
In online play, the honba count is automatically noted. When playing physically, the current dealer indicates the honba count by using 100-point sticks and placing them on the dealer indicator or on the table. These sticks are merely counters; when the seats rotate, the honba are returned to the previous dealer, and the next dealer assumes responsibility of tracking honba.
Scoring
For each honba in play, a winning hand's score increases by 300. For ron, the discarder pays the additional 300 points. For tsumo, everyone pays an additional 100 each (whether dealer or not). These extra points are added after the hand is scored, so the limits from mangan onwards do not apply. Points from honba are unaffected by the dealer bonus. For example:
- A non-dealer mangan tsumo with 2 honba is worth 8,600 in total - it costs 2,200 for non-dealers and 4,200 for the dealer.
- A dealer mangan tsumo with 2 honba is worth 12,600 in total - it costs 4,200 for each non-dealer.
In the case of sekinin barai, when the yakuman hand wins by tsumo, the discarder of the ponned tile has to pay honba. When it wins by ron, it is subject to rule variation, but most rulesets have the discarder of the winning tile pay for the honba completely.
A custom rule named basengo 「場千五」 changes each honba to be worth 1,500, five times the normal value. This rule is not common, usually seen under gambling situations.
Strategy
At only 300 points/honba, just one or two honba will have little impact on overall strategy. It could be important in all last (where 300 points can mean the difference between overtaking an opponent), but small honba counts shouldn't be considered otherwise.
When there are many honba and/or riichi sticks in play, you should consider faster hands. E.g., with 3 honba + 1 riichi stick, a base 1000 point hand will end up scoring 2900, and prevent your opponents from benefiting from the honba/riichi sticks.
External links
- Honba in Japanese Wikipedia